2333
内存马持续学习ing
https://su18.org/post/memory-shell
Servlet API 提供的动态注册机制
https://blog.csdn.net/qq_42025798/article/details/120778094
https://www.liaoxuefeng.com/wiki/1252599548343744/1304265949708322
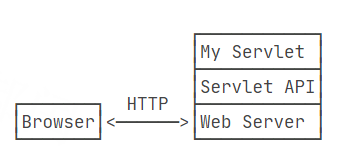
一个HTTP Server本质上是一个TCP服务器
1
2
3
4
5
6
7
8
9
10
11
12
13
|
public class HelloServlet extends HttpServlet {protected void doGet(HttpServletRequest req, HttpServletResponse resp)
throws ServletException, IOException {
resp.setContentType("text/html");
PrintWriter pw = resp.getWriter();
pw.write("<h1>Hello, world!</h1>");
pw.flush();
}
}
|
版本问题
Servlet版本
要务必注意servlet-api的版本。4.0及之前的servlet-api由Oracle官方维护,引入的依赖项是javax.servlet:javax.servlet-api,编写代码时引入的包名为:
而5.0及以后的servlet-api由Eclipse开源社区维护,引入的依赖项是jakarta.servlet:jakarta.servlet-api,编写代码时引入的包名为:
1
| import jakarta.servlet.*;
|
教程采用最新的jakarta.servlet:5.0.0版本,但对于很多仅支持Servlet 4.0版本的框架来说,例如Spring 5,我们就只能使用javax.servlet:4.0.0版本,这一点针对不同项目要特别注意。
| Servlet Spec |
JSP Spec |
EL Spec |
WebSocket Spec |
JASPIC Spec |
Apache Tomcat version |
Actual release revision |
Supported Java Versions |
| 4 |
TBD (2.4?) |
TBD (3.1?) |
TBD (1.2?) |
1.1 |
9.0.x |
9.0.0.M9 (alpha) |
8 and later |
| 3.1 |
2.3 |
3 |
1.1 |
1.1 |
8.5.x |
8.5.4 |
7 and later |
| 3.1 |
2.3 |
3 |
1.1 |
N/A |
8.0.x (superseded) |
8.0.35 (superseded) |
7 and later |
| 3 |
2.2 |
2.2 |
1.1 |
N/A |
7.0.x |
7.0.70 |
6 and later (7 and later for WebSocket) |
| 2.5 |
2.1 |
2.1 |
N/A |
N/A |
6.0.x |
6.0.45 |
5 and later |
| 2.4 |
2 |
N/A |
N/A |
N/A |
5.5.x (archived) |
5.5.36 (archived) |
1.4 and later |
| 2.3 |
1.2 |
N/A |
N/A |
N/A |
4.1.x (archived) |
4.1.40 (archived) |
1.3 and later |
| 2.2 |
1.1 |
N/A |
N/A |
N/A |
3.3.x (archived) |
3.3.2 (archived) |
1.1 and later |
动态注册特性
这时候 有了几个疑问
- 什么是动态注册
- 3.0有,那以后是没有了吗
http://c.biancheng.net/servlet2/filter.html
只能在初始化时进行注册。在运行时为了安全原因,无法完成注册。
tomcat9 已经使用 servlet 4.0 了
1
2
3
| <T extends Filter>createFilter(Java.lang.Class<T> clazz)↳
<T extends java.util.EventListener> createListener(java.lang.Class<T> clazz)
<T extends Servlet> createServlet(java.lang.Class<T> clazz)
|
Servlet、Listener、Filter 由 javax.servlet.ServletContext 去加载,无论是使用 xml 配置文件还是使用 Annotation 注解配置,均由 Web 容器进行初始化,读取其中的配置属性,然后向容器中进行注册。
Servlet 3.0 API 允许使 ServletContext 用动态进行注册,在 Web 容器初始化的时候(即建立ServletContext 对象的时候)进行动态注册。
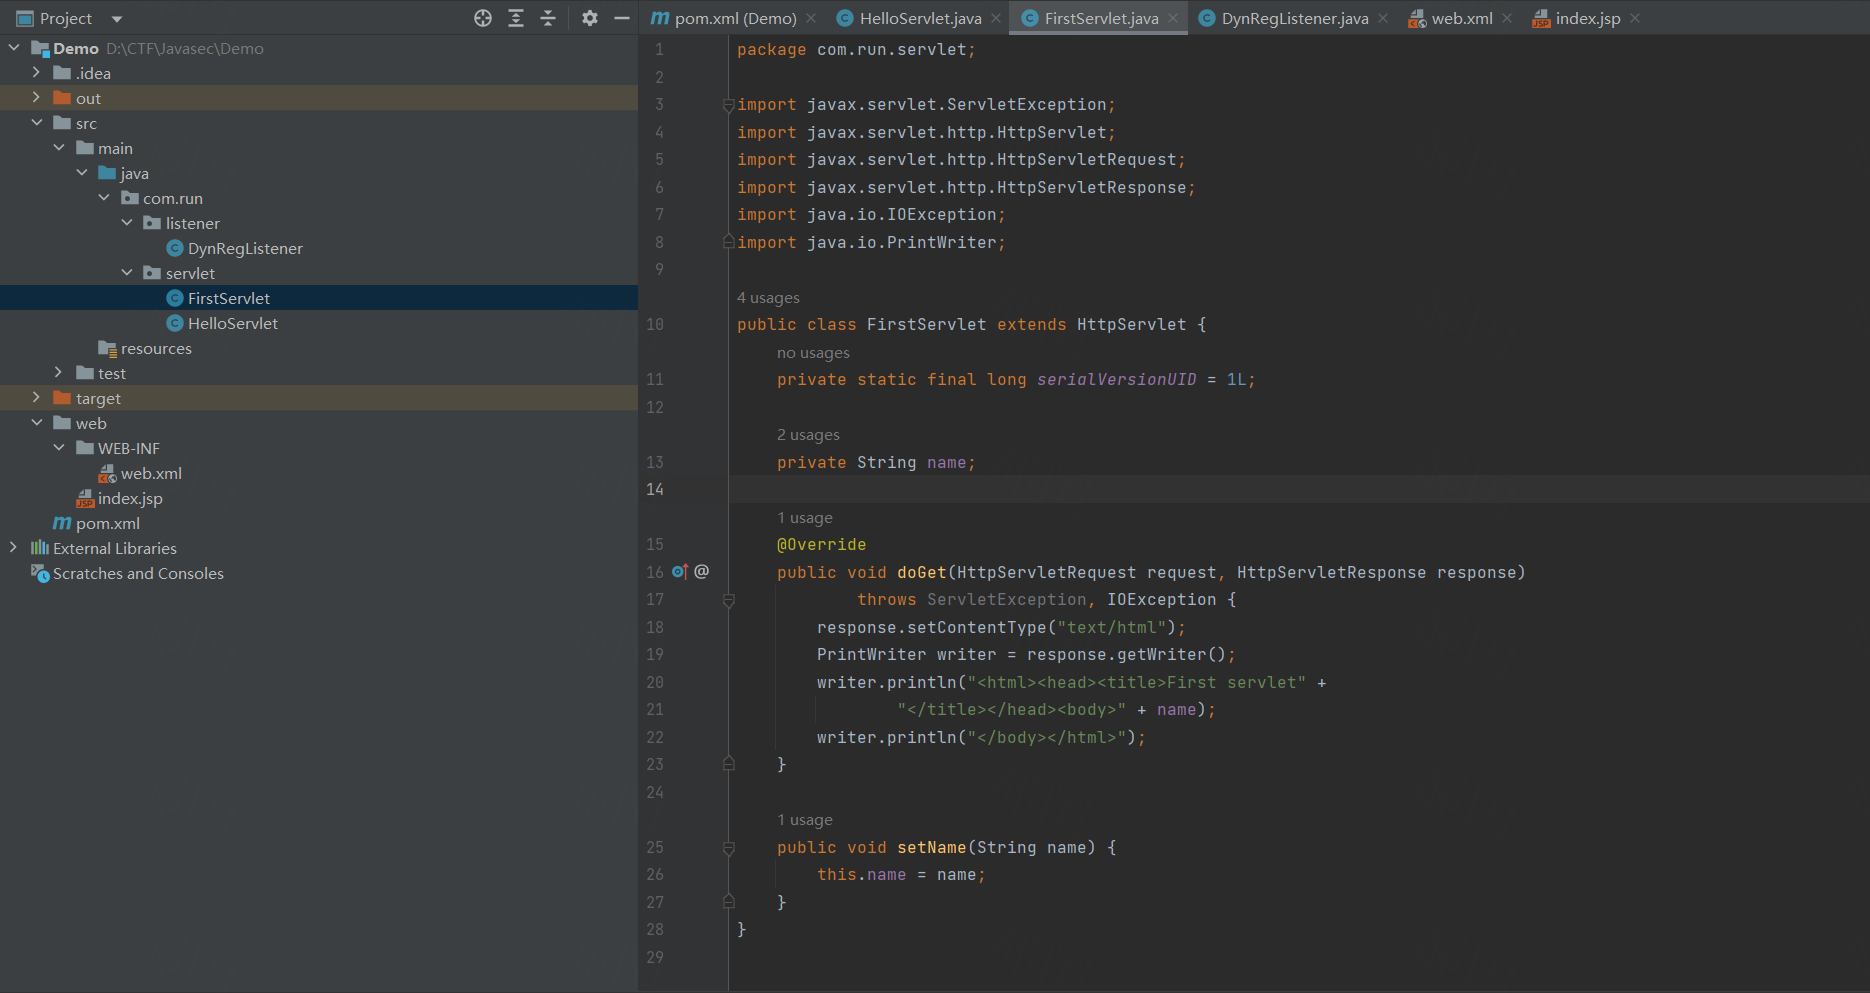
先来看一个例子 我先创建一个 servlet 但是并没有注解或者去写入web.xml 进行映射
1
2
3
4
5
6
7
8
9
10
11
12
13
14
15
16
17
18
19
20
21
22
23
24
25
26
27
28
| package com.run.servlet;
import javax.servlet.ServletException;
import javax.servlet.http.HttpServlet;
import javax.servlet.http.HttpServletRequest;
import javax.servlet.http.HttpServletResponse;
import java.io.IOException;
import java.io.PrintWriter;
public class FirstServlet extends HttpServlet {
private static final long serialVersionUID = 1L;
private String name;
@Override
public void doGet(HttpServletRequest request, HttpServletResponse response)
throws ServletException, IOException {
response.setContentType("text/html");
PrintWriter writer = response.getWriter();
writer.println("<html><head><title>First servlet" +
"</title></head><body>" + name);
writer.println("</body></html>");
}
public void setName(String name) {
this.name = name;
}
}
|
然后我们用listener来注册这个 servlet
1
2
3
4
5
6
7
8
9
10
11
12
13
14
15
16
17
18
19
20
21
22
23
24
25
26
27
28
29
30
31
32
| package com.run.listener;
import javax.servlet.*;
import javax.servlet.annotation.WebListener;
import com.run.servlet.FirstServlet;
@WebListener
public class DynRegListener implements ServletContextListener {
@Override
public void contextDestroyed(ServletContextEvent arg0) {
}
@Override
public void contextInitialized(ServletContextEvent sce) {
ServletContext servletContext = sce.getServletContext() ;
Servlet firstServlet = null ;
try {
firstServlet = servletContext.createServlet(FirstServlet.class) ;
} catch (ServletException e) {
e.printStackTrace();
}
if(firstServlet != null && firstServlet instanceof FirstServlet){
((FirstServlet) firstServlet).setName("Dynamically registered servlet");
}
ServletRegistration.Dynamic dynamic = servletContext.addServlet("firstServlet", firstServlet) ;
System.out.println("creating mapping.....");
dynamic.addMapping("/create") ;
}
}
|
之后访问 /create 就可以发现 servlet 注册成功了

内存马实现
Filter内存马
正常filter创建
1
2
3
4
5
6
7
8
9
10
11
12
13
14
15
16
17
18
19
20
21
| import javax.servlet.*;
import java.io.IOException;
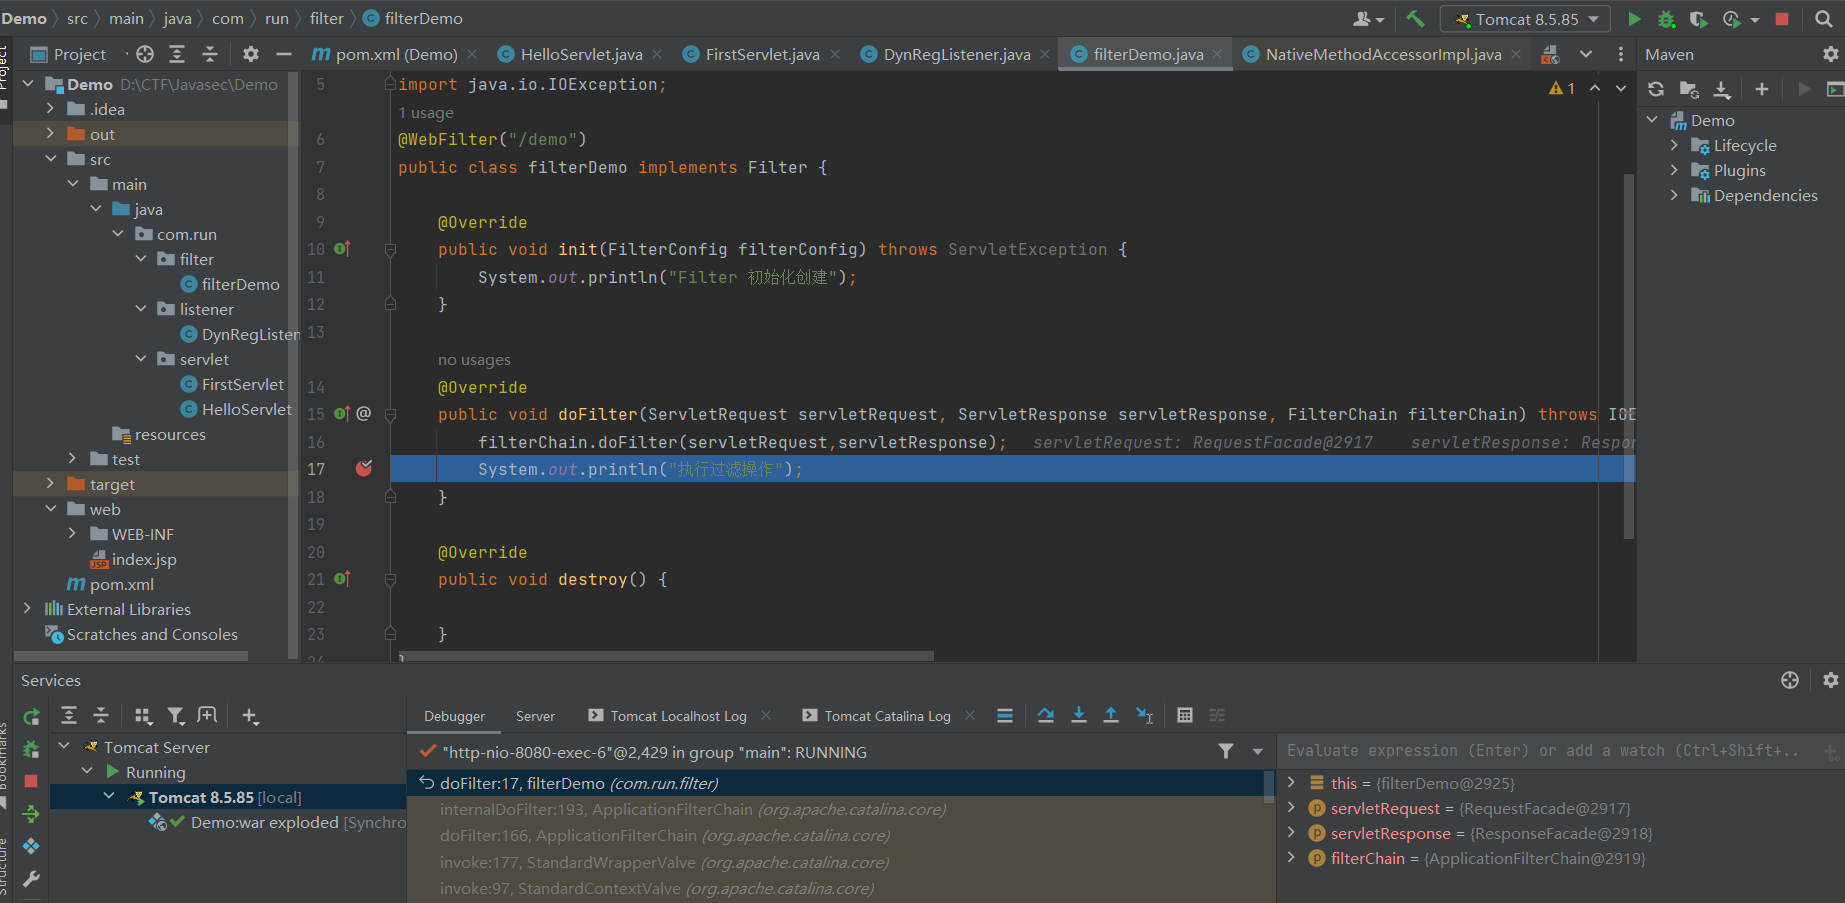
public class filterDemo implements Filter {
@Override
public void init(FilterConfig filterConfig) throws ServletException {
System.out.println("Filter 初始化创建");
}
@Override
public void doFilter(ServletRequest servletRequest, ServletResponse servletResponse, FilterChain filterChain) throws IOException, ServletException {
System.out.println("执行过滤操作");
filterChain.doFilter(servletRequest,servletResponse);
}
@Override
public void destroy() {
}
}
|
注册一下
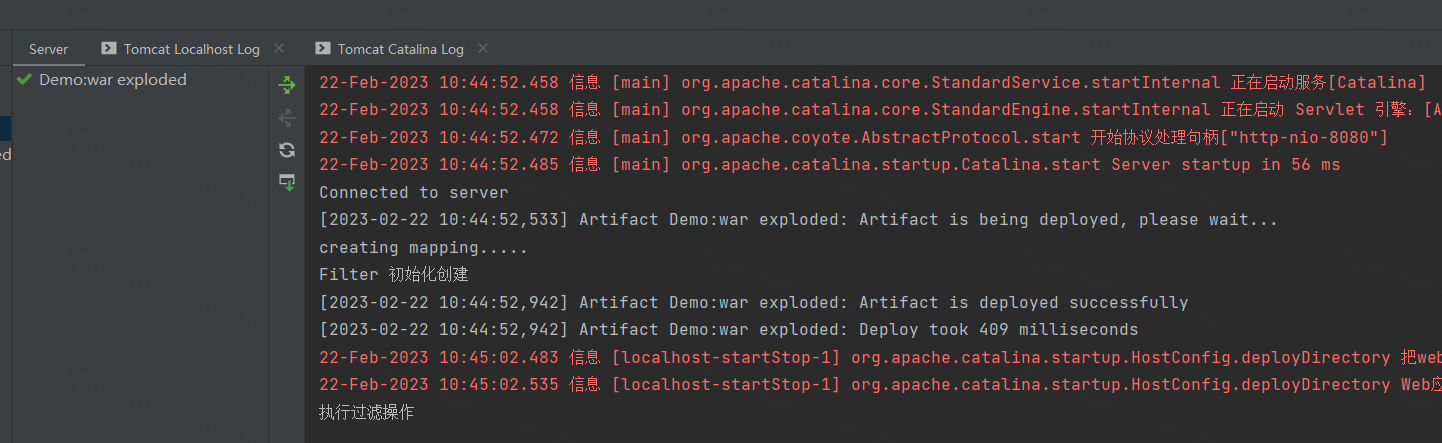
可以看出 初始化在容器start的时候
之后便会对访问执行过滤
那么怎么实现内存马呢
http://wjlshare.com/archives/1529
https://mp.weixin.qq.com/s/YhiOHWnqXVqvLNH7XSxC9w
跟一下源码看一看如何添加一个filter
打一下断点
1
2
3
4
5
6
7
8
9
10
11
12
13
14
15
16
17
18
19
20
| doFilter:17, filterDemo (com.run.filter)
internalDoFilter:193, ApplicationFilterChain (org.apache.catalina.core)
doFilter:166, ApplicationFilterChain (org.apache.catalina.core)
invoke:177, StandardWrapperValve (org.apache.catalina.core)
invoke:97, StandardContextValve (org.apache.catalina.core)
invoke:543, AuthenticatorBase (org.apache.catalina.authenticator)
invoke:135, StandardHostValve (org.apache.catalina.core)
invoke:92, ErrorReportValve (org.apache.catalina.valves)
invoke:698, AbstractAccessLogValve (org.apache.catalina.valves)
invoke:78, StandardEngineValve (org.apache.catalina.core)
service:367, CoyoteAdapter (org.apache.catalina.connector)
service:639, Http11Processor (org.apache.coyote.http11)
process:65, AbstractProcessorLight (org.apache.coyote)
process:885, AbstractProtocol$ConnectionHandler (org.apache.coyote)
doRun:1688, NioEndpoint$SocketProcessor (org.apache.tomcat.util.net)
run:49, SocketProcessorBase (org.apache.tomcat.util.net)
runWorker:1191, ThreadPoolExecutor (org.apache.tomcat.util.threads)
run:659, ThreadPoolExecutor$Worker (org.apache.tomcat.util.threads)
run:61, TaskThread$WrappingRunnable (org.apache.tomcat.util.threads)
run:750, Thread (java.lang)
|
但是调试时发现进不去源码
使用idea开发工具调试代码的时候,如果是java的web项目,使用的是tomcat作为web容器,打断点debug调试跟踪,当跟踪到org.apache.catalina包下的时候,则无法进入,这是因为idea运行的tomcat是通过插件的方式集成的,tomcat里面的lib包不再项目的依赖路径中,所以不能跟踪进去
https://www.jb51.net/article/196087.htm
我用的tomcat是 8.5.85
这里
1
2
3
4
5
6
| <dependency>
<groupId>org.apache.tomcat</groupId>
<artifactId>tomcat-catalina</artifactId>
<version>8.5.85</version>
<scope>provided</scope>
</dependency>
|
然后重新打包后就可以开心地调试了
直接来看这个 StanardWrapperValue
看看其中的 filterChain 跳到源码看一下怎么调用的
查看createFilterChain 源码
1
2
3
4
5
6
7
8
9
10
11
12
13
14
15
16
17
18
19
20
21
22
23
24
25
26
27
28
29
30
31
32
33
34
35
36
37
38
39
40
41
42
43
44
45
46
47
48
49
50
51
52
53
54
55
56
57
58
59
60
61
62
63
64
65
66
67
68
| public static ApplicationFilterChain createFilterChain(ServletRequest request, Wrapper wrapper, Servlet servlet) {
if (servlet == null) {
return null;
} else {
ApplicationFilterChain filterChain = null;
if (request instanceof Request) {
Request req = (Request)request;
if (Globals.IS_SECURITY_ENABLED) {
filterChain = new ApplicationFilterChain();
} else {
filterChain = (ApplicationFilterChain)req.getFilterChain();
if (filterChain == null) {
filterChain = new ApplicationFilterChain();
req.setFilterChain(filterChain);
}
}
} else {
filterChain = new ApplicationFilterChain();
}
filterChain.setServlet(servlet);
filterChain.setServletSupportsAsync(wrapper.isAsyncSupported());
StandardContext context = (StandardContext)wrapper.getParent();
FilterMap[] filterMaps = context.findFilterMaps();
if (filterMaps != null && filterMaps.length != 0) {
DispatcherType dispatcher = (DispatcherType)request.getAttribute("org.apache.catalina.core.DISPATCHER_TYPE");
String requestPath = null;
Object attribute = request.getAttribute("org.apache.catalina.core.DISPATCHER_REQUEST_PATH");
if (attribute != null) {
requestPath = attribute.toString();
}
String servletName = wrapper.getName();
FilterMap[] var10 = filterMaps;
int var11 = filterMaps.length;
int var12;
FilterMap filterMap;
ApplicationFilterConfig filterConfig;
for(var12 = 0; var12 < var11; ++var12) {
filterMap = var10[var12];
if (matchDispatcher(filterMap, dispatcher) && matchFiltersURL(filterMap, requestPath)) {
filterConfig = (ApplicationFilterConfig)context.findFilterConfig(filterMap.getFilterName());
if (filterConfig != null) {
filterChain.addFilter(filterConfig);
}
}
}
var10 = filterMaps;
var11 = filterMaps.length;
for(var12 = 0; var12 < var11; ++var12) {
filterMap = var10[var12];
if (matchDispatcher(filterMap, dispatcher) && matchFiltersServlet(filterMap, servletName)) {
filterConfig = (ApplicationFilterConfig)context.findFilterConfig(filterMap.getFilterName());
if (filterConfig != null) {
filterChain.addFilter(filterConfig);
}
}
}
return filterChain;
} else {
return filterChain;
}
}
}
|
filterConfig、filterMaps、filterDefs 的关系理一下

上面的代码很明显是要把 filterMaps 塞到 filterChain里边去
看看 filterMaps 都有啥 FilterMaps则对应了web.xml中配置的<filter-mapping>,里面代表了各个filter之间的调用顺序。
搜一下filterChain 就可以看到 其实就是里面具体的东西
注入内存马实际上是模拟了在web.xml中写配置的过程,两者是一一对应的。其中filterDefs存放了filter的定义,比如名称跟对应的类,对应web.xml中如下的内容
1
2
3
4
| <filter>
<filter-name>filterDemo</filter-name>
<filter-class>com.run.filterDemo</filter-class>
</filter>
|
Okk 那要去看一下 filterDefs
综上所述,如果要实现filter型内存马要经过如下步骤:
- 创建恶意filter
- 用filterDef对filter进行封装
- 将filterDef添加到filterDefs跟filterConfigs中
- 创建一个新的filterMap将URL跟filter进行绑定,并添加到filterMaps中 要注意的是,因为filter生效会有一个先后顺序,所以一般来讲我们还需要把我们的filter给移动到FilterChain的第一位去。
结果有个地方卡了半天 https://blog.csdn.net/qq_44575680/article/details/89449581
乌鱼子
Nice ~~~
现在是2月24日1点52 终于实现人生第一个内存马
servlet内存马
Listener内存马